Monday, May 29, 2017

New Weekly Layout for June!

It's a long weekend and I had time to play with my journal layout!


Nice and New!  I was so excited that I started marking it up already, just jumped right in!

I was able to take a few notes from last week, and turn them around for this week's Tuning.  I found that I had a few tracker and layout ideas that ended up falling by the wayside; biggest layout fail was my meal tracker.


I've been doing a retrospective, track what I ate by color style food tracker.  I had given myself the goal of trying to eat the rainbow in fruits and veggies everyday.  So, I set up a small grid on my weekly layout and I would color in a square with the corresponding color of fruit/veggie I consumed each day.  It's been nice, but I had to carry around all of the different marker colors, and tracking 4-5 times a day (since I eat smaller meals throughout the day) it actually took time out of my day to fill in the tracker.  So, this week I will track my meals, in planning form/ in advance, not just color.  I do use a post-it for the week to plan out dinner (on the family calendar) and my daily food plan just kind of happens the night before.  So this week I'll try adding my food information straight into my journal, instead of on an outside list.


See here for more images (Last week's Weekly Layout)


I like the weekly info/plan on the left, though it's becoming a bit crowded.  I have some plans for next weeks layout... keep it simple stupid....

I've come up with a few different ways to incorporate my lists, and not take so much time on layout.  I like the CAPA (work) to do list of the last few weeks on my post-its, but after 2 weeks I found several items were leftover from week to week, so I don't need as big of a space.

I have a couple of projects this month that will need to be pulled to the priority list, so I've added a few separate category lists to the right side.


School schedules are winding down and I'm not working as many 12 hour days.  My schedule should go back to being predictable, 8-4 type of thing, and I'll be able to put less focus to my daily (ever-changing) work schedule.  Hoping for more time for fun and projects.

I'm excited to work on these new projects, I'm sure I'll have new page ideas and will try to share them here.  Look out for my New Monthly Spread- in Hello June... coming up next!

Happy Journaling!


Saturday, May 27, 2017

Flower Bed Pages!

I've been setting aside time for myself, time to reflect and plan has been a huge anxiety reliever for me this month.  I have also found that I have increased my sketching/drawing time 100% over the last 30 days.

When I say I don't know the last time I sat down with a sketchbook, it is the truth.  Unless I have a design or deadline to fill I find I don't draw for fun anymore.  Drawing has begun to feel like a task, instead of something I truly enjoy.  I have this want to make all drawings perfect, instead of remembering a sketch is just that ( a quick reference and rarely perfect).  Remembering, drawing can never be perfect without practice.

It has been wonderful to be able to be outside again!  I forget how much we use the yard, and how wonderful it is to spend the whole day in the sun!  Come the end of the fall we close up the yard in preparations for winter.  However, the black yard is really another room at our house.  By the time spring comes and we start using the backyard, the more at home I want to stay.  It's nice to make home the place we want to be.  I love projects, surprise!

Most weekends, the husband and I have at least one Home Depot trip for some outside materials; most recently, some garden equipment and flowers for the front steps.  We got home and while Husband was clearing the gutters and mowing the lawn(I am happy to pass this chore off from time to time) I was able to weed and maintain the gardens.  Easter weekend I usually take time and clear the flower beds and put in some new bulbs.  Then clear the veggie garden and start the planning of what to grow each year to eat.  I've been fairly organized about the Veggie Garden each year.  I actually created a Victory Garden Layout Page, where I can put notes, and sketches of the progress in the back yard.  However, the side yard flower bed has been more of an "organic" process.... any by "organic" I mean not planned in anyway and very sporadic.

A few weeks ago, my father-in-law gave me some Birds of Paradise tubers, ready to plant.  However, these tubers should be dug up and stored inside for the winter.  So, I needed to find a way to track where I plant them in my "organic" Flower Bed.  So, after I cleared a few spots and put them in the ground, I did some sketching and began to layout my Flower Bed Pages.   It's been wonderful to give myself time on Sunday afternoons to layout the week, add any additional pages, and get my brain set for all the tasks I have for the week.


For this layout I decided to track everything together.  I have flowers planted to bloom in rotation, the goal is to have something in bloom at all times from April through August.  I back tracked a few dates(gave a general monthly timeline as I play catch up) but it is a great placeholder and reminder to track everything in really time next year.  The plan is to draw each flower as it blooms in location, next year maybe I will delineate from season to season, who knows.  As I sat sketching out the layout and filling in the squares my iris flowers (planted new last Easter) were beginning to bloom.  I would look back to the garden and notice the slightest shade of blue forming at the tops of each bud.  This morning... they opened!  Unfortunately it's been raining, but as it's Saturday.... Husband is coming back with some Mulch in a bit, then I plan to add sketches if the iris bloom to my journal.

 Remembering: I like doing all of the things I do. To do these things, like draw, I actually have to take the time to notice.

Here are some pages and observations.  I'll be back with updates as the summer progresses!  Enjoy the day and Happy Journaling!


Monday, May 22, 2017

New Weekly Layout

I can't say enough how much I am enjoying this process.

I have been living in this constant feeling of a Brain Cloud.... for those not familiar with Brain Clouds, please see this link:  Joe Vs the Volcano  OR better just watch the movie!!!!

So I've been listless, less impressed, and overwhelmed by all the things we have to do in life.  I've had some trouble finding joy in my daily life.  Cycling though the never-ending task lists and rarely finding time for myself.  Journaling has been a huge comfort for me, combining my love of making lists, drawing, and organization tools I have started to fast fill the small journal I moved into in May.  I have found several pages have been lost and abandoned, while others have strived and I look forward to completing the tasks/experiences on those pages.

I really loved last weeks adjustments, I find the small steps (I call it Tuning) to be super helpful.  My goal is to cut the time it takes to create a layout down to 5-10 minutes, this way I have more time to draw or fill in the important information.  My first few weekly layouts were taking me about 20-30 minutes, counting dots and laying out a page in pencil to then go over it with pen.  This week I started the layout in Pen.  This week's tuning was making smaller areas for grid lines, that are in line, without breaks, this change was super helpful.  Here I am this morning, drinking coffee and reflecting on the layout I did yesterday:


I need to work on my timeline tracker stuff (work, sleep, fun) having a reminder of my daily routines/changes everyday has been great, and I want to find the best way for me to track this information without overwhelming my need to complete the tasks.  I find being able to reflect on how much sleep I've gotten, water/fruits and veggie intake, weather, and mood vs alcohol consumption to be helpful.  This month there were a few days when I felt stressed and overwhelmed with life in general.  On stressful  days it is easy to complain about small things, the things that tilt the scale, and which in themselves are not big on the scale of destruction.  To look back to see that I had gotten less than 4 hours of sleep, not had enough water, fell back into poor eating habits, along with poor weather and lack of physical activity for numerous days/nights was helpful.  Seeing these details helped me focus on the fact that busy/rough/stressful times don't last forever.  That really the things I was complaining about were, in fact, changeable and are not the normal for me anymore.


The other Amazing thing about this layout was working on this layout yesterday and enjoying the day to the fullest.  It was such a nice day that I chose to work on my layout outside on the patio after dinner.  Here's to enjoying the days and nights to their fullest, and making sure the brain clouds stay away.

Happy journaling!


Sunday, May 14, 2017

Minecraft Tool Tutorial

My son lives in a world of Dimensions, as he calls it...

Pokemon, Super Mario, Harry Potter, Star Wars, Minecraft, and Splatoon characters and story lines have been incorporated into our every day lives.

Examples:  Sometimes Ash Ketchum, a Pokemon trainer, will meet us at the grocery store and he and his Pikachu will come home for lunch.  When he runs around the bases at baseball, he make Mario jumping sounds as he hits the bases.  While sword battling his father yesterday, he used the force to throw his father to the ground (good catch dad).  This morning he used Wingardium Leviosa to help me lift a 5gal bucket of water for the garden.  Last weekend our water ballon fight became an epic Splatoon Battle with the incorporation of Super Soakers.  While gardening today Max spent his time with his crafting table, fashioning his Minecraft weapons to use to build himself some shelter.

Max lives in a wonderful world and it is my job to help him develop it.  SO!  We make things.  Over the past few months we have been fashioning Minecraft weapons.  They are fairly simple to make, and only take about 15 minutes.  I've had a few friends ask for the steps, so here is a quick tutorial.

Items needed:
2 printed images of selected item
1 scrap piece of cardboard from whatever amazon package was just delivered
1 pair of scissors
1 exacto knife
1 sharpie or black marker
rubber cement
clear packing tape


Step 1:


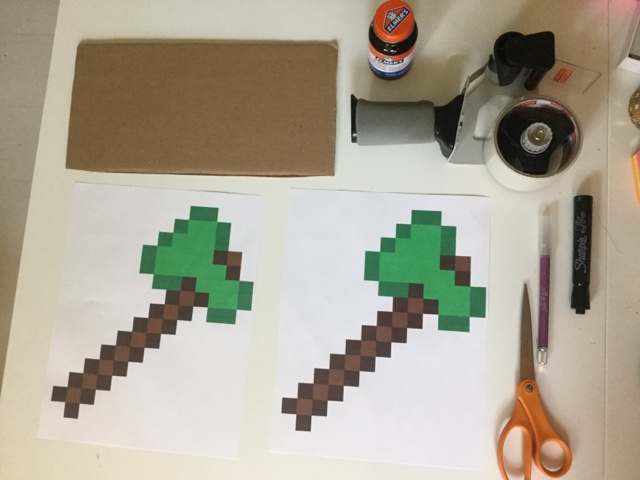
Google search Minecraft weapon through images, once selected download image.  You may need to edit the image in someway, I use a Macbook Air and find that the preview program is all I need to make adjustments.  Through the print option you can adjust the image size, I try to make it as big as I can fit on one page without too much distortion.  Sometimes you may need to flip the image.  This can be accomplished in Preview program, on the Tools drop down, select flip horizontally.  Scale both images to the same % (picture in tutorial scaled to 300%).  I started this tutorial with 2 images that were the same, make sure when you print that the images mirror each other when placed side by side (There is a photo below, Step 5 shows a mirrored image)

Step 2:


Cut out both images.  I first started cutting each square individually, this took much longer, and also was uncomfortable for the 6 year old to hold, as the handles became pointy.  So I started cutting along the diagonal, making basic shapes.  This made the process much faster, and allowed for more playtime instead of make time for my son.

Step 3:

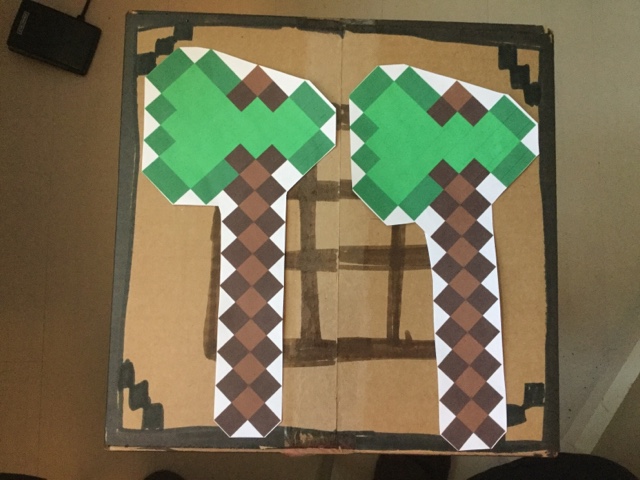
Once the 2 sides are cut out, paste on image onto a piece of cardboard.  I find using rubber cement the easiest, it is the cleanest as it comes with a brush, and doesn't bubble the painted image the way glue can.  Rubber cement allows for a temporary or permanent bond, this project will be covered in packing tape by the end, so a temporary bond will be just fine.  Which is helpful for those who may need to reposition the image on the cardboard for the best fit.  I always seem to have a surplus of cardboard, either from my home business, a package send from Grammy, or Amazon.  Anything roughly the size of a 1/2 sheet of paper should be enough.

Step 4:

Using an exacto knife, cut the cardboard around the image.  I make models regularly for my theater life, so I try and swap out blades at the end of each large project.  If you find your cuts aren't very clean try changing out your blade, a new blade will produce a cleaner cut, and will be easier to cut through.  I cut on a Alvin cutting mat, but another layer of cardboard will work too.  Just make sure you have a layer of protection under your cutting area, otherwise you may damage your work surface.

Step 5:


Here is where I realixed I forgot to flip my image..... no one's perfect....  If the images don't fit, try a flip!  So after I recut the image I added some paste onto the additional image on the opposite side of cardboard.  Trim any overhanging area, if needed.

Step 6:

Trace around the outside of the images with a black marker.  I like the Sharpie Flip cart markers, I started using regular sharpie, but the tip was small and aren't really the best option for coloring in the square.  The Flip Chart Sharpies however, give a nice line edge and cover more area.  I color in each of white squares and make sure all the edges have a black line around them.

Step 7:


Wrap in clear packing tape.  Some of the tools have angles and diagonals.  I find that placing a cut at each corner allows for more control while taping.  Simply cut the tape to the corner or turn and fold in it's own angle.  Cover any missed places and check the other side.

Step 8:

Give to 6 year old and watch the imagination play.  Max likes to make the tools with me, and today actually started making the "make" sound that happens while forging a metal tool.  It was very sweet.
I hope this was helpful, for anyone looking for a rainy-day project.  This project cost me some paper, cardboard, printer ink, a bit of paste, packing tape and 15 minutes.  All these items I had in house and added to our rainy day indoor morning.

Happy Crafting!

Tuesday, May 9, 2017

NEW WEEKLY LAYOUT!

I think tuning a layout it such a great feeling!

For me tuning a layout is calming, I find taking the time to look back and reflect is one of the best attributes to the Bullet Journal system.  As a person who needs systems to operate, it is so helpful being able to look back and track what happens each day.  To look at what I eat, what I do, and how I spend my time is helpful for my mind.  

Release has always been an issue for me, I hold onto things, feelings, ideas, tasks, always thinking of what I could have done.  So journaling, specifically Bullet Journaling has become a huge help for me in my life.  Whether a task, event, or feeling; once written down and crossed off can be forgotten.

I use my journal throughout the day, I take it with me wherever I go, I found a few things from last weeks layout.  I had lots of space per day, which was great, I could input my lists and not feel pressured to make them fit into a specific spot on the page.  The downside was that I had so much extra room some days that I felt I needed to fill things in...put a sticker, draw something, color.  While this was some days fun and a great way to relax, on busy days I forgot or just rushed through whatever I was doing to just get it done.  So, I slimmed down this weeks layout, combining it all onto one page, which freed ups some space.  Here's a picture of last weeks completed journal pages.


The other issue I was having with last weeks system was that I had 2 full pages for my weekly schedule that I had a whole 3rd page designated as DUMP.  Which is a place I can dump my more specific lists, which are usually on post its.  Example:  I get to work and I fill out a post it note with all the tasks I have to accomplish, then put it in the book so I can reference it as the day goes on.  I found referencing the DUMP page an issue, because it wasn't on my weekly page layout.  I ended up completely ignoring the lists I had made by the end of the week.  So this week I added sections to place my post it notes.  Figuring out a way to incorporate both my system of journaling with post it organization together.  Here's this weeks new layout.


So far I really like this set up.  I'm excited to see how the rest of the week goes!

Side Note!
Ever week I have had dozens of children come into my office for various reasons, this week 6 have asked specifically about organization tips (one of my students actually started using my post it system- however, she only had yellow post its.... so she wrote a color on the top of each to help her mind designate categories.... to each their own)  Anyway, this morning a Freshmen came in and saw me updating my lists in my journal.  Her eyes got big (she is a stage Manager in Training with a love of books and school supplies). She asked where I got my journal, so I thought I'd share here too.

I've been using the Multicolor Paint Splatter Dot Grid Journal from Diary Journal Book  I love the cover design, specifically the colors and size of this journal.  It's no thicker than a magazine and the paperback cover is way lighter than the hard copy journals.  I added my own Pen Holder with some Washi Tape (which I just discovered!!!!!+).  The only really drawback is the pages are a bit thin.  I use Straedtler pens and Stabilo or Sharpie Highlighters and they do seep through if I'm not careful.

For more info on the Bullet Journal System, check out www.bulletjournal.com, Thanks again Ryder Carroll

Sunday, May 7, 2017

Organization!

So, I've gotten a few questions from friends about my Organizer.  Well I found it from this amazing Instagram Post:  BabesWhoStudy Organizer Post

Who else geeks out over organization tools?  Maybe I really should have been a Stage Manager... or a teacher...

Admission:   I love School Supplies...

If they still made the real Trapper Keeper I would totally rock one.  You know the old school 3 ring notebook, with the chipboard in back.   I would even take the zipper version.  I found I was carrying around, pens, post its, a sketchbook, a few random markers and erasers, just like at the bottom of my purse.  Not the best option.

So while I was looking through bullet journal layouts I found this amazing Bullet Journal Maven.  https://babeswhostudy.tumblr.com/

She posted a few pictures of her organizer and I was hooked.  It's a little bit like that old school trapper keeper, just with way more pockets.  I can carry my iPad or my Macbook Air back and forth to school so much safer, and everything is in one place!  No need to have pens and highlighters in duplicates at home and work, just take it with me.  Without loosing anything or having a hard time remembering where I put it.  Just pile everything into my organizer and off I go.  The padding is excellent for my electronics, and the large pocket in the back can hold any paperwork that needs to travel with me.

I have a few stencils and rulers, and these awesome new Pastel Stabilo Boss Highlighters, they are my new fave.  I switch back and for between my Stabilo and Sharpie Accent Liquid Highlighters.  It's also waterproof, which was really helpful this week when my water bottle lid wasn't screwed on 100% and dribbled down the front, My bullet journal stayed dry!

The best part about this Organizer is that It was only about $20 and shipped Amazon Prime!  Bonus, not spending $100+ on anything.  So, check out this amazing organizer, I might have to look into their bags next.  This organizer is super solid, and I love the color I picked!  Check out MYGREENLIFE Organizer  I found it on Amazon for easy ordering.


Happy Journaling!


Tuesday, May 2, 2017

The Bullet Journal

So, little did I know that I have actually met and had cocktails, a couple of times, with the creator of the Bullet Journal System: www.bulletjournal.com- Ryder Carroll

So, thank you Ryder, if you ever read this: I am an ex-wife of one of your classmates.  Thank you for reminding me that I can remain analog in a digital world.  I have been reminded of how journaling helps the mind, both find focus and release.

I am an organizer, I know... SURPRISE!  I was just always placed in charge, something about being responsible and friendly.  To the detriment of my friendships and personal time, I somehow end up in charge... sorry.  Anyway, my main system for organizing thoughts have been post it notes.  I found that while living by myself in Louisville, KY in my 20's that I needed gentle reminders: Keys, lunch, brush teeth, etc.  So post-it notes became my system.  Brightly colored paper all over the walls, my desks, the fridge, and mirrors.  Helpful, but a few things.... Post it notes don't travel well from place to place.  So while I remember the tasks before me, the ones that are out of sight, were out of mind.  So while feeling unfocused, and encouraged from a check in session- I decided to start journaling.  Find a way to reflect and organize thoughts...

I spent a couple of weeks writing things down in a journal, a new one from the store with a layout and fun colors.  I ran out of space... everyday.... That's when I ran across the Bullet Journal System , so I started practicing in a journal, just something old I had shoved in a studio drawer, it had both grid lines and blank sections per page.  I found that I was drawn to the gridline, and the ability to easily sketch out a page.  I could embellish with color, though several friends warned that color can become overwhelming, which is true.  I do find that color help me categorize, for those who have seen my calendars, you know what I mean.  They were absolutely right about being overwhelmed at points.

I found that daily pages where great, but I am a planner and like to see planned tasks days ahead.  So I played with some weekly layouts, they seemed to be helpful.  I kept having the feeling of... Holding off/ Not Really Getting Started.  It felt that with all of the thought I was putting forth, the research into different layouts and ways to plan the day that I would find calm.  So, I started...

Today.... Is May 1st!  I am officially using my journal and find it enjoyable, though I'm still obsessing a little.  It is fun!  The goal is to have everything set up for the month, I've been very lucky and been able to schedule a few days off... and boy do I feel better.  I have started organizing my mind, tracking the things that I want to learn more about and enjoy.  Trying to find a positive intention to the days when I feel I have a brain cloud, maybe there's a reason.  So here I go: I hope you like the images.  Maybe I'll start sharing my layouts and progress here.  Probably a better place than all over Instagram/Facebook.  Though I'm sure I'll have some things to share there.  It's nice to be able to draw again, incorporate some daily practices and self care.  Artistic expression is important, now I can incorporate it into my daily life, not just when I have "time".  Felt like sharing my layouts so far! Enjoy!


Searching for Daily Practices...
Happy Journaling!